Your Aquarium's Answer

Category Archives: Equipment

What is protein skimming?

What Is Protein Skimming, and How Does It Work?

Next to primary biological filtration, foam fractionating, better known as protein skimming, is the next most important aspect of any healthy marine system.

Although there are systems that claim to be “skimmer-free”, such as for most of us DOC’s (dissolved organic compounds), phenol oils, and other yellowing agents are a nuisance that only active protein skimming can eliminate. Before we jump into the subject matter any deeper, let’s discuss how these devices work.


To be as unscientific and as clear as possible, let’s simply say that the air bubbles inside the skimmer’s body strip the water of undesirable waste by-products. How the bubbles accomplish this is a neat trick that needs some explanation. Ever blow bubbles as a kid? Remember all the rainbow colours on them? Just as the soap clung to the giant bubbles you were creating so too, does all the junk and other organic gunk in your aquarium water. Those pretty rainbow colours were the light refracting off the soap film…you could actually see it! In our skimmers, the bubbles are microscopic and the results can only be “seen” after they burst and deposit their “films” into the collection cup! No pretty rainbow of colour here…nope. Only the vilest and nastiest looking sludge imaginable ride our skimmer’s bubbles.

It was discovered in waste treatment plants. By injecting high volumes of air bubbles into a column of waste water, the resulting effluent was purer and much cleaner than before. This is created by a surface tension. The interaction between the oxygen bubble and the surrounding water creates a kind of friction between the two. This friction in turn “charges” the molecules in the water.

Co-Current Skimming.
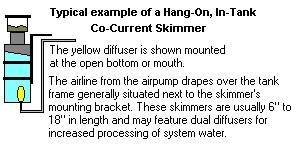
The charged gunk molecules “stick” to the bubbles, riding them up the column of water. Once the bubbles reach the surface air they burst, depositing their hitchhikers into a collection cup. This collection cup keeps the accumulated gunk from slipping back down into the water column inside the reaction chamber. Due to the very nature of saltwater, this process is possible. Freshwater protein skimming just isn’t feasible at our level as the technology to make it possible just isn’t practical at the hobby level.

Bubble size is a fundamental ingredient to a successful protein skimmer and various methods are used to create this “perfect” bubble. Originally, lime wood was and still is used to create the froth. The European hobbyists were amongst the first to recognize the importance of skimming their aquariums. Specifically, the Germans marketed some of the finest models in their day, and still do. Tunze and others brought protein skimming to our shores with the original design. This was called Co-Current skimming.

The basic, Co-Current skimmers used an open-ended tube or cylinder with the bubble source mounted at its base. As with uplift tubes utilized with under gravel filter plates, Co-Current skimmers used the volume of air bubbles rising in the column to bring the system water into contact within the chamber body. The water was “drawn” up into the cylinder from below the water’s surface and once the bubbles burst at the collection cup, the treated or stripped waters simply “fell” back down into the aquarium.

Above is a typical co-current skimmer, either hang-on or sump mounted.

Counter-Current Skimming.
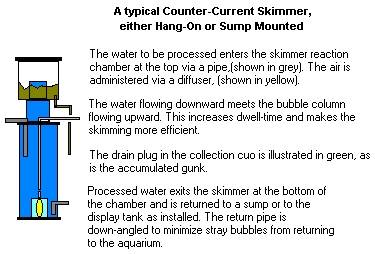
This method works but isn’t terribly efficient due to contact time of the bubbles, which is referred to as Dwell time. The only method of making this type of skimming more efficient was by lengthening the reaction chamber, more water could be processed and more “gunk” removed. The problem was this became very clumsy and unsightly as you have this monster tube sticking out behind the aquarium.

Research and development created the next step in skimmer evolution: Counter-Current Skimming.

By injecting the water at the top of the reaction tube, the bubble source at the bottom of the reaction tube and having an isolated outlet fitting, also on the bottom of the chamber, so that the water has to pass against or “counter” to the rising wall of bubbles. This effectively doubles the dwell time making for a more productive unit. Many companies today market variations on this Counter-Current design.

Venturi Style Skimming.

In the pursuit of building a better protein skimmer the next step of protein skimming was introduced. This was by air - injection. These skimmers are called venturie style skimmer. Mazzei developed what came to be known as the Mazzei Valve. These models do not use any airstone or limewood diffuser to create the bubble column. They rely on a venturi valve to deliver both the water to be treated and the billions of microscopic bubbles. This is accomplished within the wasp-waste design.

Skimmer Venturi Valve

This is a typical threaded venturi valve. The high velocity water entering from the left is bottle-necked at the moulded wasp waist. The intake nipple is arranged at the top of the tube where the water movement creates air-draw. This is how the bubbles are formed inside the valve. The froth exiting the valve is introduced into the main skimmer body where it removes organics.

As high velocity water is pumped into the valve’s main body, the channel suddenly reaches a choke-point where baffling and an outlet or “nipple” allows room air to be drawn into the valve, injecting it into a swirling jet of water to be shot into the skimmer’s reaction chamber. By offsetting the fitting at the bottom of the cylinder, a vortex is created and the contact or dwell time is increased.

Up until just a few years ago this was the professional’s choice for serious foam fractionating, and in many circles it remains as such. These skimmers require an outlet pipe as the volume of water that they can process in an hour necessitates a “flow-through” design. Usually, the effluent is high on the skimmer’s main body, being directed back into a sump or display tank. You can modify a common powerhead to provide virtually the same results. These modifications make small volume powerheads available for smaller skimmers in micro reef systems.

Even today many Hang-On Style skimmers use the modified powerhead as a main pump. They mimic the venture valve concept by allowing air to be drawn into the impeller housing where the impeller chops the water-air mixture and shoots it into the skimmer.

Environmental tower skimmer.

ETS’s & Down-Draft Skimming.

Another, even simpler design became popular just a few years ago. The “ETS” (Environmental Tower Skimmer) was introduced to the hobby. Also known as Down-Draft skimmers, these models use a long tube connected to a sump with nothing more than an internal baffle plate and a drain valve. Inside the long vertical tube, bioballs are placed to diffuse the high velocity water that is injected at it’s top. As the water shoots down over the bioballs, it is smashed on the tower of bioballs. By the time the water reaches the sump at it’s base, the water is a white sea of foam. The baffle inside the sump creates dwell time and allows the protein-rich froth to rise up into a wide-mouthed tube with the collection cup mounted above it. These designs can process huge volumes of water and are favoured by big tank owners.

Cone skimmer.

The latest in the evolution of protein skimming. This particular skimmer has been introduced in the last 18 months.

The shape of it looks like an upsidedown ice cream cone. Air- Injection is through a powerhead fitted with Needle wheel. The reason for this shape skimmer is the air bubbles rise to the top of the cone with no neck where the bubbles were being trapped on the old design of skimmer, thus making this type of skimmer more efficient with more bubble contact time for the protein to be removed with.

At present the most efficient skimmer on the market.

Hope this article has shed some more light on the various options of skimming.

What Is Protein Skimming, and How Does It Work?

Next to primary biological filtration, foam fractionating, better known as protein skimming, is the next most important aspect of any healthy marine system.

Although there are systems that claim to be “skimmer-free”, such as for most of us DOC’s (dissolved organic compounds), phenol oils, and other yellowing agents are a nuisance that only active protein skimming can eliminate. Before we jump into the subject matter any deeper, let’s discuss how these devices work.
To be as unscientific and as clear as possible, let’s simply say that the air bubbles inside the skimmer’s body strip the water of undesirable waste by-products. How the bubbles accomplish this is a neat trick that needs some explanation. Ever blow bubbles as a kid? Remember all the rainbow colours on them? Just as the soap clung to the giant bubbles you were creating so too, does all the junk and other organic gunk in your aquarium water. Those pretty rainbow colours were the light refracting off the soap film…you could actually see it! In our skimmers, the bubbles are microscopic and the results can only be “seen” after they burst and deposit their “films” into the collection cup! No pretty rainbow of colour here…nope. Only the vilest and nastiest looking sludge imaginable ride our skimmer’s bubbles.
It was discovered in waste treatment plants. By injecting high volumes of air bubbles into a column of waste water, the resulting effluent was purer and much cleaner than before. This is created by a surface tension. The interaction between the oxygen bubble and the surrounding water creates a kind of friction between the two. This friction in turn “charges” the molecules in the water.

Co-Current Skimming

The charged gunk molecules “stick” to the bubbles, riding them up the column of water. Once the bubbles reach the surface air they burst, depositing their hitchhikers into a collection cup. This collection cup keeps the accumulated gunk from slipping back down into the water column inside the reaction chamber. Due to the very nature of saltwater, this process is possible. Freshwater protein skimming just isn’t feasible at our level as the technology to make it possible just isn’t practical at the hobby level.

Bubble size is a fundamental ingredient to a successful protein skimmer and various methods are used to create this “perfect” bubble. Originally, lime wood was and still is used to create the froth. The European hobbyists were amongst the first to recognize the importance of skimming their aquariums. Specifically, the Germans marketed some of the finest models in their day, and still do. Tunze and others brought protein skimming to our shores with the original design. This was called Co-Current skimming.
The basic, Co-Current skimmers used an open-ended tube or cylinder with the bubble source mounted at its base. As with uplift tubes utilized with under gravel filter plates, Co-Current skimmers used the volume of air bubbles rising in the column to bring the system water into contact within the chamber body. The water was “drawn” up into the cylinder from below the water’s surface and once the bubbles burst at the collection cup, the treated or stripped waters simply “fell” back down into the aquarium.
Above is a typical co-current skimmer, either hang-on or sump mounted.

Counter-Current Skimming

This method works but isn’t terribly efficient due to contact time of the bubbles, which is referred to as Dwell time. The only method of making this type of skimming more efficient was by lengthening the reaction chamber, more water could be processed and more “gunk” removed. The problem was this became very clumsy and unsightly as you have this monster tube sticking out behind the aquarium.
Research and development created the next step in skimmer evolution: Counter-Current Skimming.
By injecting the water at the top of the reaction tube, the bubble source at the bottom of the reaction tube and having an isolated outlet fitting, also on the bottom of the chamber, so that the water has to pass against or “counter” to the rising wall of bubbles. This effectively doubles the dwell time making for a more productive unit. Many companies today market variations on this Counter-Current design.

Venturi Style Skimming
In the pursuit of building a better protein skimmer the next step of protein skimming was introduced. This was by air - injection. These skimmers are called venturie style skimmer. Mazzei developed what came to be known as the Mazzei Valve. These models do not use any airstone or limewood diffuser to create the bubble column. They rely on a venturi valve to deliver both the water to be treated and the billions of microscopic bubbles. This is accomplished within the wasp-waste design.

Venturi Style Skimming

Skimmer Venturi Valve

This is a typical threaded venturi valve. The high velocity water entering from the left is bottle-necked at the moulded wasp waist. The intake nipple is arranged at the top of the tube where the water movement creates air-draw. This is how the bubbles are formed inside the valve. The froth exiting the valve is introduced into the main skimmer body where it removes organics.
As high velocity water is pumped into the valve’s main body, the channel suddenly reaches a choke-point where baffling and an outlet or “nipple” allows room air to be drawn into the valve, injecting it into a swirling jet of water to be shot into the skimmer’s reaction chamber. By offsetting the fitting at the bottom of the cylinder, a vortex is created and the contact or dwell time is increased.

Up until just a few years ago this was the professional’s choice for serious foam fractionating, and in many circles it remains as such. These skimmers require an outlet pipe as the volume of water that they can process in an hour necessitates a “flow-through” design. Usually, the effluent is high on the skimmer’s main body, being directed back into a sump or display tank. You can modify a common powerhead to provide virtually the same results. These modifications make small volume powerheads available for smaller skimmers in micro reef systems.
Even today many Hang-On Style skimmers use the modified powerhead as a main pump. They mimic the venture valve concept by allowing air to be drawn into the impeller housing where the impeller chops the water-air mixture and shoots it into the skimmer.

Environmental tower skimmer

Don Carner
ETS’s & Down-Draft Skimming
Another, even simpler design became popular just a few years ago. The “ETS” (Environmental Tower Skimmer) was introduced to the hobby. Also known as Down-Draft skimmers, these models use a long tube connected to a sump with nothing more than an internal baffle plate and a drain valve. Inside the long vertical tube, bioballs are placed to diffuse the high velocity water that is injected at it’s top. As the water shoots down over the bioballs, it is smashed on the tower of bioballs. By the time the water reaches the sump at it’s base, the water is a white sea of foam. The baffle inside the sump creates dwell time and allows the protein-rich froth to rise up into a wide-mouthed tube with the collection cup mounted above it. These designs can process huge volumes of water and are favoured by big tank owners.
Cone skimmer
The latest in the evolution of protein skimming. This particular skimmer has been introduced in the last 18 months.
The shape of it looks like an upsidedown ice cream cone. Air- Injection is through a powerhead fitted with Needle wheel. The reason for this shape skimmer is the air bubbles rise to the top of the cone with no neck where the bubbles were being trapped on the old design of skimmer, thus making this type of skimmer more efficient with more bubble contact time for the protein to be removed with.
At present the most efficient skimmer on the market.
Hope this article has shed some more light on the various options of skimming.

Wave Makers

Wave Makers

Central to the idea of creating a more natural environment in the aquarium is the use of two or three powerheads to circulate the water completely in the tank. The advantages are:

a. Elimination of DEAD ZONES in the tank.
b. Suspension and removal of pollution via the overflow system.
c. Creation of GLITTER LINES on the surfaces and sand.
d. Maintains adequate oxygen levels.
e. Keeps the fish / corals active and promotes the periodic SKIN REMOVAL of soft corals.

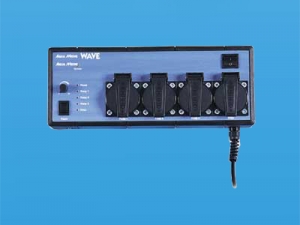
The OCEAN RUNNER, SICCE, MAXI JET powerhead pumps come in various sizes and can be connected to the AQUA MEDIC WAVE machine, which automatically varies the pumps in a random manner. The wave machine has SOFT START electronics, which protect the pumps from burn out.

The RE-CIRCULATION pump (sump) is also connected to the WAVE MACHINE.
There is also a FEED BUTTON which when activated ALL water movement is halted so that minimal food is wasted when feeding the fish.
A LIGHT SENSOR attachment is also available which when attached the sensor sensors night turns off two of the powerheads which will insurers the tank is not over circulated at night when compared to the daytime cycles.

AQUA MEDIC WAVE - 3 x 1. Facility for three powerheads and one return pump.
There are various other methods of creating a wave action, such as.
A powerhead that has a wave action movement on it. By using this method you can create a more realistic simulation of the ocean by putting powerheads on either end of the tank and creating a tidal action. For example you would be able to run to powerheads on the left-hand side for six hours, then turn those off and run the other two on the other end for six hours creating an incoming and outgoing tide.
Either way when one has used a method described above only then does one realise the importance of using such a piece of equipment.

UV Sterilizer

UV Sterilizers can be beneficial to both Reef and Fish Only tanks.

What is the sterilizer?

It is a container, usually in a near tube shape, in which an ultraviolet (UV) fluorescent lamp is contained. The lamp emits light at around 254 nm. The lamp is in a container of its own to shield it from the water, and then there is an outer container. The lamp is constructed of quartz glass to prevent the UV being absorbed as it would be if ordinary glass were used. The space between the containers is very small allowing full penetration of UV light. The water is passed between the outer and inner containers by a pump or power head. It is very important that you have a UV sterilizer that is rated for your aquarium size.


What does a UV sterilizer in a reef tank or a Fish only tank do?

The major job of the unit as far as aquarists are concerned is the destruction of minute free swimming parasites and other disease causing organisms. The organism must be in the UV area for a sufficient time.) The threat of disease is reduced, but not entirely removed. Sterilizers are a good tool in order to keep away certain diseases, but the at home aquarist must still be on the lookout for disease. It is also important to research the disease that is expected, Ich is one disease that a UV sterilizer will combat . be necessary. A UV sterilizer is very effective in helping to combat brookynella, a fairly common disease known as clown fish disease. A further very important point is that the UV lamp has a limited life; bulbs need to be replaced every 12 to 18 months. The other important thing to remember is to use the right size delivery pump to the UV steriliser.

Top-Up Unit

Aqua Medic Aquaniveau.

The Aquaniveau electronic level controller may be used in 2 different modes:

As a top up controller with one or two float switches to control the replacement of evaporated water. One switch controls the pumping from a storage vessel (not supplied), the other, if opted for, provides protection to prevent the top up pump (not supplied) from running dry.

As maximum / minimum contact to control reverse osmosis units, in conjunction with a solenoid valve, or connecting to a reverse osmosis water reservoir.

When it comes to reefkeeping, there are numerous basic tasks we’d like to automate.


One of the most desired features is a way to top-off the tank automatically in order to reolace water that has evaporated from the system, and many beginning hobbyists may not consider how important this is.

As water evaporates, salinity rises in the display tank because salt does not evaporate.

The water simply becomes more and more saline the longer the hobbyist waits to add freshwater.
While some prefer to top-off their systems manually every day, it is easy to become lackadaisical and slack off on this important duty.

Others incorporate an automatic top-off system into their system, drawing RO/DI water from a nearby or remote reservoir.

Many reefkeepers, however, choose to run their RO/DI unit’s output directly into their sump, using a float valve to shut it off when the desired water level has been reached. This is something that has led to many heartbreaking disasters, and thus I’m strongly opposed to setting up a reef tank that is connected directly to an RO/DI unit. Things will go wrong! For example:

  • If the float switch fails, even two switches used in succession for redundancy, water will be continuously added to the tank until its owner notices. This will drop the tank’s salinity and kill the livestock, plus flood the floor. This just happened to a friend of mine who travels a lot. Two switches failed, and he lost his livestock that he’d had for over four years
  • If the protein skimmer overflows, especially if it is external (located outside the sump), RO water will be added non-stop until the owner notices, and this results in the same issues mentioned above.
  • If the aquarist has the RO unit connected to a Kalkwasser reactor, and the float switch fails or the protein skimmer goes nuts, RO water will be added to the reactor non-stop, which mixes with Kalkwasser powder; thus the tank’s pH will spike and kill all the livestock. Kalkwasser has a pH of 12, and our livestock lives in a range from 7.9 to 8.3.

All of these things can and do happen - almost on a regular basis.

The reservoir should hold only enough water so that if all its contents were dumped into the sump, the sump would not overflow and the tank would be able to absorb that additional volume of freshwater without excessively dropping the tank’s salinity (RO/DI water) or raising its pH excessively (kalkwasser).

In a nutshell, I don’t recommend a fully automated system because something will go wrong if a hobbyist isn’t attentive.

We have the duty to inspect equipment to keep our livestock healthy and happy, and it takes only a minute or two each day to ensure that everything is operating correctly.
Our reef tank (a 1200 L tank, plus 500 L in the sump) has a 80 L top-off reservoir.

I use an Maxi jet pump to add more water to the sump when the float switch senses the water level has dropped, It can push only 20 L on a good day as it is on a timer.

If every drop of the reservoir was added at once, my tank would be unphased. The 80 L of top-off water it contains supplies enough water for four days.

So I just replenish the container manually every three or four days. It really isn’t a big hassle. If someone wanted to hook up his RO/DI unit directly to a reservoir like this, he could do so easily with a float valve. However, what I recommend is that once the reservoir is full, he should turn off the RO unit until it is time to refill the reservoir.

A few additional points:

  • When going out of town or on business or holiday, turn off the water going to the RO/DI unit.
  • If you are going on holiday and don’t use an auto top-off, determine how much water will evaporate from your tank for the number of days you’ll be away. If your sump has the space to hold that additional volume, add it slowly over a day’s time. Adding this much water may affect the tank’s salinity, as will all the evaporation during your absence, but this is undoubtedly preferable to returning home to a disaster.
  • Using a dosing pump that matches the tank’s evaporation rate is another method. Dosing pumps can be regulated with a controller or an electrical timer which is the method I use. When purchasing a dosing pump, get one that closely matches your system’s needs. If the tank evaporates 5 L per day, the dosing pump should pump approximately 5 L per day, not 15 L per day. Oversizing the dosing pump is just another possible disaster that will strike when Murphy dictates.
  • Using an electrical sensor float switch also works very well and are quite reliable, but needs to be cleaned regularly (especially when dosing kalkwasser)
  • Using a controller to measure the tank’s pH allows for a degree of safety. If the pH rises too high due to excess kalkwasser being added, the controller can turn off the protein skimmer, causing that water to pour back into the sump, raising the water level and disabling any further top-off. The controller can be set up to close a solenoid valve to prevent any more water from being added to the system
  • If possible, it is best to drip kalkwasser independently of the top-off (RO/DI water). The steady drip rate using the gravity method should be fairly safe in that it will never be able to overdose your tank.

Never believe that your system is immune to disaster. Even as you read this article, review your current setup and see if any changes are long overdue.

Ozoniser

Aquarium filtration systems have improved greatly during the last ten years and the desire to achieve the best water quality encourages today’s fish-keepers to use high flow mechanical / biological filters, large foam fractioner (Protein skimmers), U.V. sterilizers and more.

However even with the quality of today’s aquarium filtration, there are a few dissolved and fine organics components that tend to accumulate in an aquarium which the ordinary filtration systems fail to remove. Generally the only way to reduce them is by frequent water changes.

Conventional means of solids removal, such as sponge/ perlon floss filters and sand filters address the removal of coarse settleable and filterable solids, but not the removal of fine colloidal solids. Similarly, nitrifying bacteria in bio-filters remove dissolved ammonia and nitrite, but not all dissolved organic wastes. As an aquarium matures, the accumulation of dissolved organic colloidal solids increases. This organic build-up decreases the performance of the nitrifying bacteria that convert nitrite to nitrate, thus causing harming nitrite build-up. The biochemical oxygen demand also rises, so the oxygen levels decrease over time. These shifts in water parameters stress the aquarium inhabitants and may even cause mortality. To reduce the necessity of large water changes, that can change the systems chemical parameters (PH, salinity, alkalinity etc.), there is a very efficient alternative method of breaking down these organic wastes using a strong oxidizing agent, this method is “Ozonation”.

Ozone (O3) has been used, for a long time as a disinfectant and as an oxidizer that removes turbidity, algae, odour, colour and taste in the municipal drinking water supply. Applying ozone to fresh water, marine and reef aquariums will achieve the following properties:

• Removal of Micronics solids (1-100 microns) by clumping them together to bigger dimension particles that can be removed by the protein skimmer or activated carbon.
• Removal of complicated dissolved organics that cannot be handled by ordinary bio-filter. The ozone oxidizes them and breaks them to simple organics that are now available for degradation by heterotrophic bacteria.
• Reduction of harmful ammonia (NH3-) and nitrite (NO2-) levels by oxidizing them to nitrate (NO3-).
• Precipitation of metals, such as aluminium.
• Algae control
• Destruction of harmful inorganic components, such as sulphides.
• Degradation of pesticides and detergents.
• Bacterial disinfections & viral inactivation: 0.4 mg/L at a 4-minute contact time easily kill bacteria and inactivate 99% of viruses.

Ozone is a very unstable molecule that is formed when an Oxygen molecule (O2) bonds to a third oxygen atom by passing the oxygen through an electrical charge or U.V. light at the proper wavelength. Because of the loosely bound third atom, ozone exhibits a far greater oxidative potential compared to oxygen. The ozone reacts with organic molecules at unsaturated carbon bonds, which quickly decompose in water to form carbonyl components and hydrogen peroxide. In solution ozone has been shown taking to pathways as it decomposes and oxidizes materials. The first pathway is by direct reaction with molecular ozone and the second is by indirect action of the oxidized compound with radicals formed by the decomposition of ozone.

The advantages of ozone are:

• Powerful oxidizing agent. Reduces BOD and COD levels.
• Very rapid reaction time.
• 5 times more effective as a disinfectant for bacteria and viruses, than Cl2.
• Requires short contact time.
• Produces a complete reaction because of its short half-life (20-30 min.)
• Leaves a beneficial oxygen residual

Production and utilization of ozone:
Most commercially available ozone generators use corona discharge to establish a strong electric field. Dried air or oxygen gas is fed through the electric field. Due to the electrical energy, a proportion of the oxygen molecules become excited, creating oxygen atoms that bind to other molecules to create ozone.

The feed gas must be dry and free from impurities. If a feed gas of air or low purity oxygen contains moisture, nitric acid is formed, which rapidly decomposes the produced ozone and is also highly corrosive.

The design of the ozone-to-water contact chamber is the most critical design element in using an ozone system. Since ozone in the carrier gas (air) is at relatively low concentration, mass transfer of the ozone from a gas into the water must be done at maximum efficiency. In marine and reef aquariums, we already have an efficient reactor vessel in which to utilize ozone, our protein skimmer. The protein skimmer materials must be highly resistant or inert to ozone. Use of improper materials can lead to erosion of the unit and cause leakage.

Ozone can be applied continuously, as a series of treatments, or as single batch treatment per day. The optimum rate for disinfection is highly variable and represents the sum of ozone demand from dissolved organics, colloidal solids, etc. The amount of ozone necessary is largely dependent on the background organic loading of the water to be treated. In pure water, residual concentration of 0.01-0.1 ppm for period of 15 seconds can be effective in reducing bacterial loads. In most of our aquarium systems 5-15 mg/hr/100 liters is sufficient amount to get proper disinfection. A more accurate rule is 1.5 mg for 1hr/day/ 1 gr of fish weight. If the purpose of the ozone is to treat the dissolved organic matter, the optimum rate should be according to daily feed rate. It is recommended 10 mg ozone per gram of fish food, to reduce accumulated organics.

The best method to monitor ozone input is by measuring the oxidation-reduction potential (ORP) with probes or by a Redox meter/controller. The term Redox potential refers to the electrons transfer from one substance to another that takes place in every chemical reaction. The substance that receives electrons is said to have been oxidized, while the one that loses electrons is said to have been reduced. In sea water, many of these so called ‘redox reactions’ occur simultaneously. Because of the constant exchange of electrons the amount of prevailing oxidative or reductive reaction can be measured as a voltage, by means of a platinum electrode and a volt meter. The higher the redox potential, the greater the oxidizing capacity of the water. In sea water the redox potential is between 350-400 mV. Redox potential values of between 300 and 350 mV are recommended as the desirable level, which indicate an oxygen rich environment with low dissolved organics. The redox potential can therefore be used as an indication of the quality of your Aquarium environment. Values below 200 mV indicate an accumulation of disolved organics and a low oxygen level.

As ozone is applied to aquarium water it will raise the oxygen level and break down organic wastes, i.e. sterilizing the water thus raising the redox potential. A too high redox potential is as undesirable as a low redox potential therefore it is advisable to keep the redox potential stable by applying ozone. When the redox potential is lower than the desired value, ozone should be applied and when the upper limit of the redox potential is reached the ozone should be turned off. This control can be achieved by combining a Redox controller to the ozone generator.

Red Sea manufactures a range of technically advanced ozonisers (The AquaZone) with 50, 100 and 200 mg/hr output. Red Sea also offers AquaZone PLUS which combines an Ozoniser and Redox controller. The following chart will help to determine the ozoniser suitable for each kind of system up to the maximum volume indicated.

Safety Precautions for using Ozone:

Ozonized air should be prevented from escaping into the room; it is advisable to install a carbon filter on your protein skimmer or ozone reactor where ozonized air escapes. Do not let the redox value of the aquarium water exceed 400 mV as harmful substances (commonly in the form of hypochloric and hypobromic acids) can be produced, which could damage sensitive organisms. The aquarium inhabitants should be protected from exposure to free ozone and /or oxidation products. The recommended method to remove any residual free ozone and any free oxidation products is by vigorous aeration followed by filtration through activated carbon. After this treatment the amount of residual ozone should be checked regularly – maximum 0.05mg per liter.


Marine Lighting Guide

The type and amount of lighting is one of the most important considerations when setting up a new marine aquarium. There are types of lighting to suit most budgets, all with their own pros and cons for specific applications.

If you are considering a ‘Fish only’ system the amount of lighting is less of a factor in the success of your aquarium than it would be if you wish to create a ‘Reef aquarium’. In this guide we will look at the various types of lighting available and the reasons for choosing (or not choosing) each one. We will also look briefly at the intensity of light required by different types of saltwater aquariums.
Fish Only Systems
If you intend to keep fish only (i.e. no corals or other invertebrates) then the lighting does not need to be too intense, in fact, lighting which is too intense could lead to nuisance algae problems within a fish only aquarium. The lighting should still be of the correct spectrum for a marine aquarium in order to mimic the sunlight found in the inhabitant’s natural habitat. A combination of ‘Marine White’ and ‘Marine Blue’ (actinic) lighting is preferable in most cases.
Suggested lighting type: T5, T8, LED

Fish Only With Live Rock
The lighting required for this type of aquarium is the same as that of the Fish only system outlined above. However, if the lighting is increased slightly the aquarium will benefit.
Suggested lighting type: T5, LED

Soft Coral Reef
As this aquarium will most likely contain photosynthetic invertebrates the lighting required will be more intense than the previous types of marine aquarium mentioned. Most (though not all) soft corals require light to grow and flourish. A 50:50 marine white/marine blue ratio is a good starting point and will be desirable to both your corals and yourself from an aesthetic point of view.
Suggested lighting type: T5, Metal Halide, LED

Full Reef Aquarium
The lighting required for a full reef aquarium (i.e. an aquarium containing SPS/LPS corals) is significantly more intense than for any other type of marine aquarium. Insufficient lighting can result in coral bleaching or coral death. Most corals have a symbiotic relationship with algae which lives inside the tissue of their body. The algae use light to photosynthesize and the coral feeds on the by-products of this procedure, insufficient lighting will therefore cause the coral to effectively starve to death over a period of time. As a general rule of thumb for a reef aquarium you should aim for 1 watt of lighting per liter of aquarium water. This should be used as a guideline only as many factors such as aquarium depth, tank inhabitants and surface area of the tank have an effect on the lighting required. We would advise that T5 lighting should not be used on aquariums deeper than 30” without additional metal halide lighting unless no corals are placed below this point.
Suggested lighting type: T5, Metal Halide, LED

Lighting types
So, you’ve decided on which type of aquarium you wish to set up, you know how intense the lighting should be and you know which types of lighting are able to provide this, but, wish type should you purchase? Now we will take a look at the pros and cons of each lighting type.
T8
T8 lighting is probably the most common form of lighting supplied with ‘Complete’ aquariums. The tubes are 1 inch in diameter and are available in many different lengths and outputs. One of the main advantages of this type of lighting is that, as mentioned above, if you have purchased a ‘complete’ aquarium and wish to convert it to marine it is relatively straightforward to retro fit the lighting as a tube change is all that is required.
Fluorescent light tubes become less efficient after 9-12 months and the colour temperature can shift. This means that in order to keep your aquarium looking at its best you must replace the tubes every 9-12 months.
The output of this type of lighting is considered to be quite low in relation to other types of lighting available today which means that they are only really suited to a fish only system.
Fitting reflectors to T8 lighting is definitely something that we would recommend. Doing this can increase the light actually reaching the aquarium by up to 100%.
T8 lighting should only be used on aquariums up to 50 cm” deep.
T5
T5 lighting is becoming an increasingly common choice amongst aquarium manufacturers when selecting the lighting that is included with aquariums. This is good news for the same reason as T8 lighting. Retro fitting marine specific lighting involves merely changing the bulbs.
T5 lighting is similar in physical appearance to T8 lighting but is 5/8 inch in diameter. The T5 tube will produce a significantly higher output when compared to the same length of T8 lamp, e.g. a 48” T8 tube produces 36w of light whereas a 48” T5 tube will produce 54w. While T5 lighting is marginally more expensive than T8 lighting, in terms of ‘bang for buck’ the T5 represents better value.
As with T8 tubes, these lamps will need to be replaced every 9-12 months due to light quality degradation.
T5 tubes generate heat which can be an issue in aquariums with hoods, although the heat output is not normally an issue.
As with T8 tubes, reflectors can be fitted to T5 lamps to greatly increase their useful output.
Using T5 lighting in your aquarium normally allows you to easily upgrade once your experience (and wallet) allows. Adding more T5 tubes is an easy way to increase light output if you decide to move from soft corals to LPS/SPS. You will need an appropriate lighting controller and the bulbs to add more lighting. The controller is normally positioned in the cupboard out of sight, and the new lights attached to the existing hood using the brackets supplied with the controller.
T5 tubes should only be used on aquariums up to 30” deep unless they are being used as supplemental lighting to metal halides.
Metal Halide
Metal halide lighting was, until very recently, seen as the only real choice for lighting a full reef aquarium due to its high light output capabilities. Using metal halides also creates a pleasing (and natural looking) shimmer effect on the sand bed and corals in an aquarium.
Metal halides are capable of penetrating the aquarium water to greater depths than other forms of lighting, although LED technology is rapidly improving in this area. As a general rule we would suggest using the following as a minimum for a full reef aquarium:
60 cm” Depth = 150w Metal Halide
70 cm” Depth = 250w Metal Halide
90 cm +” Depth = 400w Metal Halide
Metal halides will need to be suspended above the aquarium either from a wall or a ceiling. This gives the benefit of being able to easily adjust the distance between the light source and the water surface to fine tune spread of light and intensity.
As metal halides generate a significant amount of heat, suspending them above the tank allows for air flow around the units and the surface of the water to aid cooling. In summer, fans may be required to keep things cool.
Bulbs in metal halide units will need to be replaced every 8-12 months.
Metal halides normally need to be supplemented with actinic T5 lights to provide the correct light spectrum for coral growth.
The running costs and energy consumption of metal halide lighting are considerable. However, if you wish to keep SPS corals successfully in a relatively deep aquarium, they are almost a necessity.
If using more than 1 metal halide lamp to light your aquarium you may find that a chiller becomes essential in order to keep the aquariums temperatures in check.
LED lighting is now capable of giving comparable performance, but still something very new with development progressing at a rapid rate.

Kalk Stirer

What is a Kalk stirrer?

This piece of equipment is connected to your top-up unit that tops up with RO water.

As you can see in the picture the long column is filled with RO water from your top-up and into this you add 1 teaspoon of calcium hydroxide powder (Kalkwasser). This column is designed to be air tight. If air is allowed into the column it reduces the efficiency of the Kalkwasser being dosed into the tank, which defeats the purpose of adding Kalkwasser which is for the purpose of maintaining the pH, alkalinity and calcium levels in the tank.


The Kalk reactor can either be used on its own or in conjunction with a calcium reactor. In large systems I have found using a Kalk stirrer with a calcium reactor works far better as they work hand in hand with each other maintaining pH, alkalinity and calcium. Kalk stirrers only work in a system where the tank is losing enough water through evaporation taking place, to dose enough Kalkwasser to the system to maintain pH, alkalinity and calcium. The only way to find out whether the Kalk stirrer is sustaining the water parameters is to check pH, alkalinity and calcium for a couple of weeks. Once assessed as to what the water parameters are, one can then make the decision as to whether a calcium reactor may be needed or not. In the event of the water parameters still reading low one then has no option but to add a calcium reactor to maintain these water parameters.

One thing that must be remembered when dosing with calcium hydroxide through a Kalk stirrer or any other means the pH and alkalinity must be monitored carefully due to the pH of calcium hydroxide being at a pH of 12 whereas the normal pH of a marine tank is 8.3. The same thing is said for monitoring carefully alkalinity and calcium.

In tanks fewer than 500 L a Kalk stirrer does not work efficiently enough to maintain these water parameters due to there not being enough evaporation for the top-up to dose enough RO water through the Kalk stirrer to maintain the pH, alkalinity and calcium. There is no option then, but to manually add extra calcium, alkalinity buff, or pH to maintain the various water parameters required.

I hope this has shed more light on what the Kalk stirrer does.

Hydor Powerheads

KORALIA Nano-1-2-3-4 12V is a new innovative range of low voltage circulation pumps designed by Hydor. The five models (Nano-1-2-3-4) connected to the KORALIA WAVEMAKER 2 and 4, guarantee a continuous and powerful water flow which can be directed freely thanks to the special suction magnet for great support.*

Exclusive Hydor design and technology, high performance, extraordinary safety and quality standards and amazing low energy consumption characterize this new, unique range of pumps specifically designed to function only connected with WAVEMAKER 2 or 4 electronic controller. The WAVEMAKER allows you to create waves and tidal effects which are vital for the healthy maintenance of reef aquariums.

Koralia Nano magnet in tanks with glass/acrylic up to 10 mm thick; Koralia 1-2-3-4 magnet in tanks with glass/acrylic up to 15 mm thick

KORALIA 5-6-7-8 12V is a new range of low voltage circulation pumps designed by Hydor. The four models connected to the KORALIA WAVEMAKER 4 and 2*, guarantee a continuous and powerful water flow which can be directed freely thanks to the special suction magnet for great support in tanks with glass (or acrylic) from 12 to 20 mm thick (from 0,5 to 0,8 in). High performance and extraordinary safety and quality standards and amazing low energy consumption characterize this new, unique range of pumps specifically designed to function only connected with WAVEMAKER 2 or 4 electronic controller. The WAVEMAKER allows you to create waves and tidal effects which are vital for the Healthy maintenance of reef aquariums.
Great for movement il large tanks!
* Compatible only with second generation WAVEMAKER 2, that is characterized by a yellow lable on the outer packaging, and by a stripe on the inner packaging.
This range of pounds we will have in stock by the middle of November.

Calcium Reactor

The addition of calcium to a salt-water aquarium is essential to coral/coralline algae growth and survival. In the oceans calcium is supplied on a continuous basis via the ocean currents at ± 400ppm (parts per million). Calcium can be added manually by regular additions or automatically using a continuous CALCIUM REACTOR.

The reactor contains pure calcium hydrocarbonate which is dissolved slowly and dropped into system. CO2 (carbon-dioxide) is introduced into the reactor to lower the PH to ± 6.5 which then dissolves the calcium substrate. The reactor has an internal pump circulating the closed unit thereby spreading the CO2 equally throughout - sea water is introduced via a bypass from the RE-CIRCLE pump. Or directly with its own dosing pump. The required amount of calcium will depend on the size bioloading of the tank. A PH probe can be inserted into the reactor to measure the acidity of the water thereby controlling the amount of CO2 needed to maintain the correct PH (6.5). A solinoid switch valve will keep the required PH in the reactor automatically. It is a good idea to use a solinoid switch to dose CO2. In the event of not using a pH probe to control the dosing of CO2 one can set the drip rate of the effluent water coming out of the reactor at 2 1/2 L per hour for 1000 L tank, and then set the CO2 so that the pH of the water coming out of the reactor is 6.5. Checking that the alkalinity is sitting at 22 ppm. By doing it this way you have to monitor the calcium levels in your tank more closely.

The calcium reactors greatest advantage is twofold:
a) Calcium is supplied daily to the system allowing the invertebrates to use it as required. It stabilizes the night/day PH swings and maintains the alkalinity of the system.
b) Small amounts of CO2 is introduced to the system which stimulates coral growth especially hard corals.

Calcium Hydroxide (KALKWASSER) can also be added automatically ug the KALKWASSER REACTOR.