Although there are systems that claim to be “skimmer-free”, such as for most of us DOC’s (dissolved organic compounds), phenol oils, and other yellowing agents are a nuisance that only active protein skimming can eliminate. Before we jump into the subject matter any deeper, let’s discuss how these devices work.
To be as unscientific and as clear as possible, let’s simply say that the air bubbles inside the skimmer’s body strip the water of undesirable waste by-products. How the bubbles accomplish this is a neat trick that needs some explanation. Ever blow bubbles as a kid? Remember all the rainbow colours on them? Just as the soap clung to the giant bubbles you were creating so too, does all the junk and other organic gunk in your aquarium water. Those pretty rainbow colours were the light refracting off the soap film…you could actually see it! In our skimmers, the bubbles are microscopic and the results can only be “seen” after they burst and deposit their “films” into the collection cup! No pretty rainbow of colour here…nope. Only the vilest and nastiest looking sludge imaginable ride our skimmer’s bubbles.
It was discovered in waste treatment plants. By injecting high volumes of air bubbles into a column of waste water, the resulting effluent was purer and much cleaner than before. This is created by a surface tension. The interaction between the oxygen bubble and the surrounding water creates a kind of friction between the two. This friction in turn “charges” the molecules in the water.
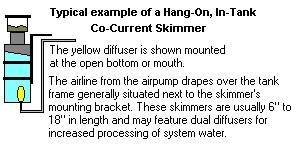
Co-Current Skimming.
The charged gunk molecules “stick” to the bubbles, riding them up the column of water. Once the bubbles reach the surface air they burst, depositing their hitchhikers into a collection cup. This collection cup keeps the accumulated gunk from slipping back down into the water column inside the reaction chamber. Due to the very nature of saltwater, this process is possible. Freshwater protein skimming just isn’t feasible at our level as the technology to make it possible just isn’t practical at the hobby level.
Bubble size is a fundamental ingredient to a successful protein skimmer and various methods are used to create this “perfect” bubble. Originally, lime wood was and still is used to create the froth. The European hobbyists were amongst the first to recognize the importance of skimming their aquariums. Specifically, the Germans marketed some of the finest models in their day, and still do. Tunze and others brought protein skimming to our shores with the original design. This was called Co-Current skimming.
The basic, Co-Current skimmers used an open-ended tube or cylinder with the bubble source mounted at its base. As with uplift tubes utilized with under gravel filter plates, Co-Current skimmers used the volume of air bubbles rising in the column to bring the system water into contact within the chamber body. The water was “drawn” up into the cylinder from below the water’s surface and once the bubbles burst at the collection cup, the treated or stripped waters simply “fell” back down into the aquarium.
Above is a typical co-current skimmer, either hang-on or sump mounted.
Counter-Current Skimming.
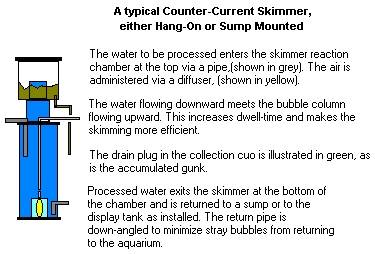
This method works but isn’t terribly efficient due to contact time of the bubbles, which is referred to as Dwell time. The only method of making this type of skimming more efficient was by lengthening the reaction chamber, more water could be processed and more “gunk” removed. The problem was this became very clumsy and unsightly as you have this monster tube sticking out behind the aquarium.
Research and development created the next step in skimmer evolution: Counter-Current Skimming.
By injecting the water at the top of the reaction tube, the bubble source at the bottom of the reaction tube and having an isolated outlet fitting, also on the bottom of the chamber, so that the water has to pass against or “counter” to the rising wall of bubbles. This effectively doubles the dwell time making for a more productive unit. Many companies today market variations on this Counter-Current design.
Venturi Style Skimming.
In the pursuit of building a better protein skimmer the next step of protein skimming was introduced. This was by air - injection. These skimmers are called venturie style skimmer. Mazzei developed what came to be known as the Mazzei Valve. These models do not use any airstone or limewood diffuser to create the bubble column. They rely on a venturi valve to deliver both the water to be treated and the billions of microscopic bubbles. This is accomplished within the wasp-waste design.
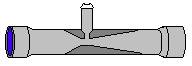
Skimmer Venturi Valve
This is a typical threaded venturi valve. The high velocity water entering from the left is bottle-necked at the moulded wasp waist. The intake nipple is arranged at the top of the tube where the water movement creates air-draw. This is how the bubbles are formed inside the valve. The froth exiting the valve is introduced into the main skimmer body where it removes organics.
As high velocity water is pumped into the valve’s main body, the channel suddenly reaches a choke-point where baffling and an outlet or “nipple” allows room air to be drawn into the valve, injecting it into a swirling jet of water to be shot into the skimmer’s reaction chamber. By offsetting the fitting at the bottom of the cylinder, a vortex is created and the contact or dwell time is increased.
Up until just a few years ago this was the professional’s choice for serious foam fractionating, and in many circles it remains as such. These skimmers require an outlet pipe as the volume of water that they can process in an hour necessitates a “flow-through” design. Usually, the effluent is high on the skimmer’s main body, being directed back into a sump or display tank. You can modify a common powerhead to provide virtually the same results. These modifications make small volume powerheads available for smaller skimmers in micro reef systems.
Even today many Hang-On Style skimmers use the modified powerhead as a main pump. They mimic the venture valve concept by allowing air to be drawn into the impeller housing where the impeller chops the water-air mixture and shoots it into the skimmer.
Environmental tower skimmer.
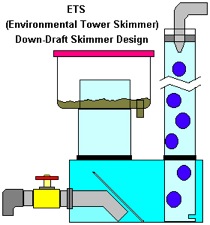
ETS’s & Down-Draft Skimming.
Another, even simpler design became popular just a few years ago. The “ETS” (Environmental Tower Skimmer) was introduced to the hobby. Also known as Down-Draft skimmers, these models use a long tube connected to a sump with nothing more than an internal baffle plate and a drain valve. Inside the long vertical tube, bioballs are placed to diffuse the high velocity water that is injected at it’s top. As the water shoots down over the bioballs, it is smashed on the tower of bioballs. By the time the water reaches the sump at it’s base, the water is a white sea of foam. The baffle inside the sump creates dwell time and allows the protein-rich froth to rise up into a wide-mouthed tube with the collection cup mounted above it. These designs can process huge volumes of water and are favoured by big tank owners.
Cone skimmer.
The latest in the evolution of protein skimming. This particular skimmer has been introduced in the last 18 months.
The shape of it looks like an upsidedown ice cream cone. Air- Injection is through a powerhead fitted with Needle wheel. The reason for this shape skimmer is the air bubbles rise to the top of the cone with no neck where the bubbles were being trapped on the old design of skimmer, thus making this type of skimmer more efficient with more bubble contact time for the protein to be removed with.
At present the most efficient skimmer on the market.
Hope this article has shed some more light on the various options of skimming.